
How to Hatch Chicken Eggs: Complete 21-Day Incubation Guide
Hatch chicken eggs at home with this day-by-day incubation guide. Covers temperature, humidity, turning, candling, and what to do on hatch day.
Hatching chicken eggs at home is one of the most rewarding experiences in backyard chicken keeping. The process takes 21 days from start to finish, and while it requires attention to detail, it's absolutely doable for beginners with the right setup. Here's everything you need to know to go from fertile egg to fluffy chick.
What You'll Learn
- •What You Need Before You Start
- •Where to Get Fertile Eggs
- •Setting Up Your Incubator
- •Temperature and Humidity Settings
- •Egg Turning: Why It Matters
- •Day-by-Day Incubation Timeline
- •How to Candle Eggs
- •Lockdown: Days 18 to 21
- •Hatch Day: What to Expect
- •Moving Chicks to the Brooder
- •Troubleshooting Common Problems
- •Incubator vs Broody Hen
- •Frequently Asked Questions
What You Need Before You Start
You don't need a lot of gear, but what you do need matters. Here's your shopping list:
Incubator. This is the big one. You've got two main options:
- •Still-air incubators (no fan) are cheaper but have more temperature variation throughout the unit. You'll need to monitor more carefully.
- •Forced-air incubators (with fan) circulate air evenly and are more forgiving. They're worth the extra cost for beginners.
Budget models start around $40 to $60 and can handle 7 to 12 eggs. Mid-range models ($80 to $150) often include automatic egg turners, digital temperature displays, and humidity controls. For a first hatch, a mid-range forced-air incubator with auto-turning is the sweet spot.
Thermometer and hygrometer. Even if your incubator has built-in gauges, get a separate digital thermometer/hygrometer to verify readings. Built-in sensors can be off by a degree or two, and that matters.
Egg candler. A bright LED flashlight works fine. You'll use this to check embryo development through the shell. Dedicated egg candlers are available for about $10 to $15, but any bright, focused light source does the job.
Brooder setup. You'll need this ready before hatch day. A heat source, chick starter feed, waterer, and bedding. See our week-by-week chick raising guide for the complete brooder setup.
Where to Get Fertile Eggs
You can't hatch grocery store eggs. Those are unfertilized. You need eggs from a flock that includes a rooster.
Your own flock. If you've got a rooster and hens, you're set. Collect eggs for up to 7 days before incubating, storing them at 50 to 60°F, pointed end down. Fertility is highest when there's 1 rooster per 8 to 10 hens.
Local breeders. Check Facebook Marketplace, Craigslist, or your local poultry group. Buying local means the eggs haven't been shipped, which gives you better hatch rates. You can also pick specific breeds you want.
Online hatcheries. Many sell hatching eggs shipped via USPS. Expect lower hatch rates (50 to 75%) from shipped eggs due to handling during transit. Let shipped eggs rest pointed-end-down at room temperature for 12 to 24 hours before placing them in the incubator.
Tips for selecting eggs:
- •Choose clean, regular-shaped eggs (no cracks, weird bumps, or extreme sizes)
- •Avoid eggs that are too large (doubles) or too small
- •Don't wash the eggs; the bloom (natural protective coating) helps during incubation
Setting Up Your Incubator
If you have not bought one yet, our guide to the best chicken egg incubators breaks down the models worth your money by flock size and budget. Already have one? Get it running at least 24 to 48 hours before adding eggs. This stabilization period is critical.
Place the incubator in a room with a stable temperature, away from windows, vents, and direct sunlight. Temperature swings in the room translate to temperature swings in the incubator. A closet or interior room works best.
Fill the water channels or reservoir per your incubator's instructions. Add warm (not hot) water to bring humidity up.
Set the temperature and let it stabilize for a full day. Check it multiple times. If the temperature fluctuates more than a degree, troubleshoot before adding eggs.
Temperature and Humidity Settings
Getting these right is the single most important factor in a successful hatch. Small deviations make a big difference over 21 days.
Temperature:
- •Forced-air incubator (with fan): 99.5°F (37.5°C). This is measured at egg level.
- •Still-air incubator (no fan): 101 to 102°F (38.3 to 38.9°C) measured at the top of the eggs. The reading is higher because there's no air circulation to equalize temperature.
Even half a degree too high or too low matters. Too high speeds development and can cause deformities or early death. Too low slows development and can result in late or failed hatches.
Humidity:
- •Days 1 to 17: 45 to 55% relative humidity
- •Days 18 to 21 (lockdown): 65 to 75% relative humidity
Humidity controls how much moisture evaporates from the egg through the shell. Too little humidity and the air cell grows too large, dehydrating the embryo. Too much humidity and the air cell stays too small, which can drown the chick during hatching.
You can adjust humidity by adding or removing water from the incubator's channels, using sponges for more surface area, or adjusting ventilation plugs.
Egg Turning: Why It Matters
In nature, a broody hen turns her eggs dozens of times per day. This prevents the developing embryo from sticking to the shell membrane and ensures even heat distribution.
Manual turning: Turn eggs at least 3 times per day (odd numbers so they don't spend every night on the same side). Mark each egg with an X on one side and an O on the other so you can track which have been turned. Rotate gently, about 180 degrees each time.
Automatic turners: If your incubator has an auto-turner, let it do the work. Most turn eggs every 1 to 2 hours. Just make sure it's actually working by checking periodically.
Stop turning on day 18. This is when lockdown begins. The chick is positioning itself for hatching and needs to stay in place.
Always wash your hands before handling eggs. Oils and bacteria from your skin can clog shell pores and harm the developing embryo.
Day-by-Day Incubation Timeline
Here's what's happening inside the egg throughout the 21-day incubation:
Days 1 to 3: The embryo begins forming. The heart starts beating by the end of day 2. You won't see much if you candle this early.
Days 4 to 6: Blood vessels spread across the yolk. By day 5, you can see a spider web of veins when candling, with a dark spot (the embryo) at the center.
Days 7 to 10: The embryo grows rapidly. Legs, wings, and beak start forming. This is a great time for your first detailed candling check. Clear eggs (no veins, no dark spot) are infertile and should be removed.
Days 11 to 14: The embryo is growing fast and taking up more of the egg. Feathers begin developing. The air cell at the large end of the egg is getting bigger.
Days 15 to 17: The chick fills most of the egg. You'll see mostly dark when candling, with the air cell clearly visible at the wide end. Last chance to remove any eggs that stopped developing.
Days 18 to 21: Lockdown period. The chick positions itself for hatching, absorbs the remaining yolk sac, and pips through the air cell to start breathing with its lungs. Then it pips through the shell and hatches.
How to Candle Eggs
Candling means shining a bright light through the egg to see what's happening inside. It's how you check for fertility, development, and problems. Our step-by-step guide to candling eggs walks through what you'll see at each stage.
When to candle:
- •Day 7 to 10: First check. Remove clear (infertile) eggs and any with blood rings (early death).
- •Day 14: Second check. Remove any eggs that stopped developing.
- •Day 18: Final check before lockdown. Verify the air cell size.
How to do it:
- •Work in a dark room.
- •Hold the bright light source against the large end of the egg.
- •Cup your hand around the egg and light to block ambient light.
- •Look for veins, movement, and the air cell.
What you're looking for:
- •Fertile and developing: Network of blood vessels, dark embryo, movement (in later days)
- •Infertile (clear): The egg looks the same as day 1; you can see the yolk shadow but no veins
- •Blood ring: A red ring inside the egg with no veins spreading out. The embryo died early.
- •Quitter: Dark mass that stopped growing, no blood vessel network, possibly a dark ring
Remove infertile and dead eggs to prevent bacterial buildup that could contaminate developing eggs if they burst.
Lockdown: Days 18 to 21
Lockdown is the final stretch, and it requires a shift in how you manage the incubator.
On day 18:
- •Stop turning eggs (remove auto-turner if applicable)
- •Raise humidity to 65 to 75%
- •Don't open the incubator unless absolutely necessary
- •Lay eggs on their sides if they were in a turner that held them upright
The chick is now positioning head-under-wing with its beak near the air cell. Over the next day or two, it'll "internal pip," breaking through the membrane into the air cell and taking its first breaths of air.
On days 19 to 20: You might hear peeping from inside the eggs. This is normal and exciting. The chick is breathing air from the air cell and getting ready to pip through the shell.
Resist the urge to open the incubator. Every time you open it, humidity drops dramatically. Low humidity during hatching causes the membrane to dry out and shrink-wrap around the chick, trapping it.
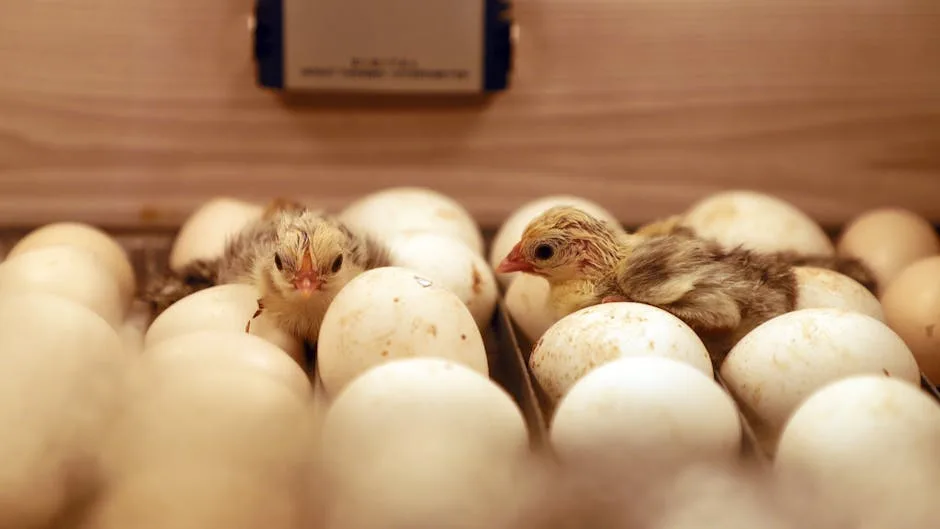
Hatch Day: What to Expect
Most chicks hatch on day 21, though anywhere from day 19 to day 23 is within normal range. Temperature fluctuations during incubation can shift the timing.
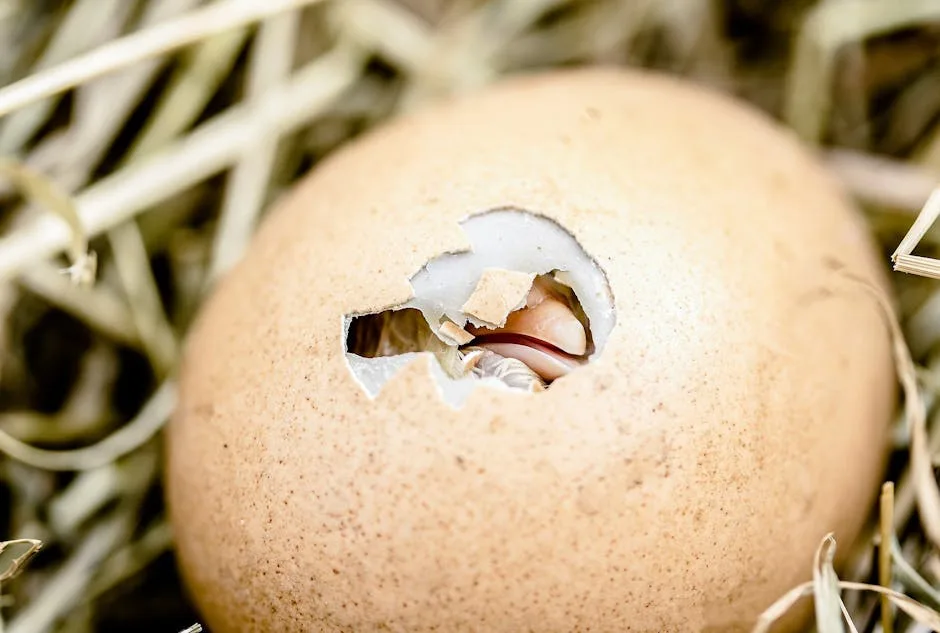
The hatching process:
- •External pip: A small crack or bump appears on the shell. The chick has broken through with its egg tooth (a small, hard point on the beak).
- •Resting: After the first pip, the chick often rests for 6 to 12 hours. This is normal. Don't intervene.
- •Zipping: The chick rotates inside the egg, cracking a line around the circumference. This can take several hours.
- •Hatching: The chick pushes out of the shell. It'll be wet, wobbly, and exhausted.
Important rules for hatch day:
- •Don't help. Seriously. The urge to help a struggling chick is strong, but premature assistance can cause bleeding if the chick hasn't fully absorbed its blood vessels and yolk sac. Only intervene if a chick has pipped but made zero progress for 24+ hours.
- •Leave hatched chicks in the incubator until they're fluffy and dry (6 to 12 hours). They don't need food or water yet since they're still absorbing the yolk sac, which sustains them for up to 72 hours.
- •Don't open the incubator to remove hatched chicks until a batch is done, or do it quickly to minimize humidity loss.
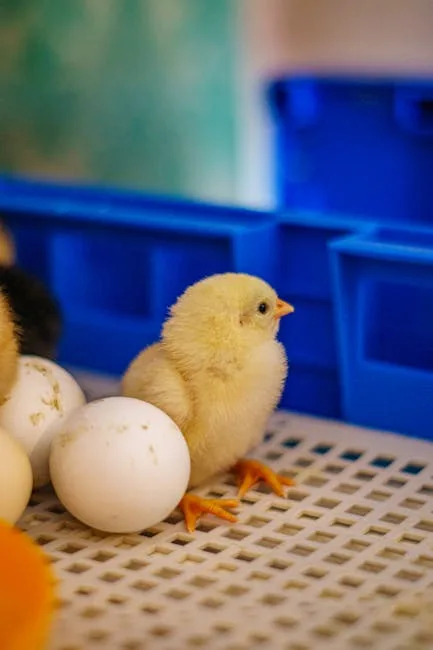
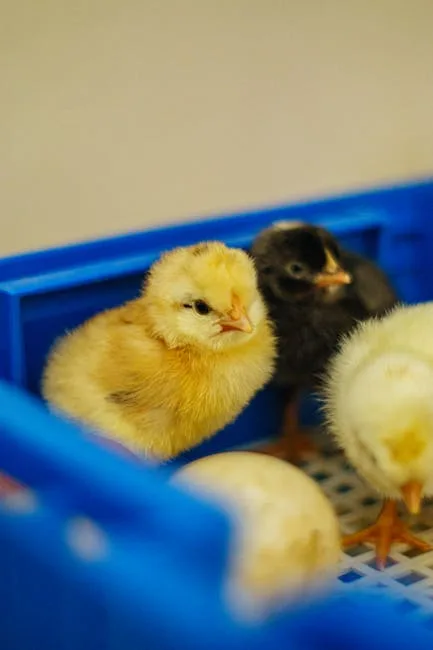
Moving Chicks to the Brooder
Once chicks are dry and fluffy, transfer them to a pre-heated brooder. Your brooder should be set up and running before hatch day.
Brooder basics:
- •Temperature: 95°F for the first week, then reduce by 5°F per week
- •Use a heat plate (safer than heat lamps) for the heat source
- •Chick starter feed with 18 to 20% protein
- •Clean water with marbles or pebbles in the tray to prevent drowning
- •Bedding: paper towels for the first few days (so chicks learn what food is), then switch to pine shavings
Dip each chick's beak in the water as you place it in the brooder so it knows where to drink. Sprinkle a bit of feed on the paper towel floor to encourage pecking. Many keepers also add chick probiotics to the brooder water for the first week to help chicks build gut flora as they transition from yolk-sac nutrition to feed.
For the full week-by-week breakdown of raising chicks from day one through integration with your flock, check out our chick raising guide.
Troubleshooting Common Problems
Low hatch rate (under 50%):
- •Temperature was off (even 1°F matters over 21 days)
- •Humidity too high or low
- •Eggs weren't turned enough
- •Shipped eggs had rough handling
- •Eggs were too old before incubation (use within 7 days of laying)
Chicks pipping but not hatching:
- •Humidity too low during lockdown (membrane dried and trapped them)
- •Temperature too low, causing weak chicks
- •Genetics (some breeds have lower hatch rates)
Early embryo death (days 1 to 7):
- •Temperature spikes or drops
- •Eggs were stored improperly before incubation
- •Contamination from dirty hands or dirty eggs
Late embryo death (days 15 to 21):
- •Humidity problems during lockdown
- •Temperature issues
- •Inadequate ventilation (embryos need oxygen exchange through the shell)
Eggs exploding: A rotten egg can build up gas and burst, contaminating the entire incubator. This is why candling and removing dead eggs is so important. If you smell a foul odor, find and remove the bad egg immediately.
Incubator vs Broody Hen
You don't technically need an incubator at all. A broody hen will do all the work for you, maintaining perfect temperature and humidity, turning eggs, and raising the chicks after they hatch.
Advantages of a broody hen:
- •Zero equipment needed
- •She handles everything: turning, temperature, humidity
- •Chicks learn from her and integrate into the flock naturally
- •No electricity bill
Disadvantages:
- •You can't control timing (she goes broody when she decides to)
- •Not all breeds go broody reliably. Silkies and Buff Orpingtons are the most dependable broody breeds.
- •She stops laying during brooding and chick-rearing (6 to 8 weeks)
- •Harder to hatch specific breeds unless you swap eggs under her
Advantages of an incubator:
- •You control the timing
- •Can hatch any breed regardless of your flock's broodiness
- •Higher capacity (some incubators hold 40+ eggs)
- •Educational and fun to watch
For many backyard keepers, using a broody Silkie as a natural incubator is the easiest approach. If you want more control or don't have broody breeds, an incubator is the way to go.
Frequently Asked Questions
What temperature should I incubate chicken eggs at?
For forced-air incubators (with a fan), set the temperature to 99.5°F (37.5°C). For still-air incubators (no fan), set it to 101 to 102°F (38.3 to 38.9°C), measured at the top of the eggs. Even half a degree off can affect hatch rates, so use a separate thermometer to verify your incubator's reading.
How long does it take for chicken eggs to hatch?
Chicken eggs take 21 days to hatch under normal conditions. However, anywhere from day 19 to day 23 is considered within normal range. Temperature fluctuations during incubation are the main reason hatches come early or late. Higher temps speed things up; lower temps slow them down.
Can you hatch eggs without an incubator?
Yes, if you have a broody hen. She'll sit on the eggs for 21 days, maintaining the perfect temperature and humidity naturally. Silkies, Buff Orpingtons, and Cochins are the breeds most likely to go broody. You can even slip eggs from other breeds under a broody hen and she'll hatch them.
How do you know if an egg is fertile before incubating?
You can't tell from the outside. The only way to check before incubating is to crack open a sample egg and look for the bullseye pattern on the yolk (a small white circle with a clear center). During incubation, candle eggs at day 7 to 10 to confirm fertility by looking for blood vessels and a developing embryo.
What's a good hatch rate for beginners?
A 50 to 75% hatch rate is solid for beginners. Experienced hatchers with good equipment and fresh, local eggs can hit 80 to 90%. Shipped eggs typically have lower rates (40 to 70%) due to handling. Don't be discouraged by a rough first hatch; you'll improve with each batch.
Hatching your own chicks connects you to the chicken-keeping experience in a way that buying pullets can't match. It takes some patience, attention to detail, and a willingness to learn from mistakes. Ready to plan the rest of your flock? Check out our guide on how many chickens a beginner should start with to figure out the right number for your space.
Sources:
- •University of Kentucky Cooperative Extension. Small Flock Poultry. https://poultry.extension.org/
- •Penn State Extension. Backyard Poultry Resources. https://extension.psu.edu/animals/poultry
- •University of Florida IFAS. 4-H Poultry Project. https://edis.ifas.ufl.edu/
- •Cornell University Cooperative Extension. Small-flock Poultry. https://cals.cornell.edu/
Related Guides
How to Candle Eggs: A Day-by-Day Hatching Guide
Learn how to candle chicken eggs step by step. What to look for on day 7, 14, and 18, how to spot a quitter, and the gear you need. Beginner friendly.
Beginner GuidesHow Much Money Can You Make Selling Eggs? Real 2026 Math
Real profit numbers for selling backyard eggs: revenue and costs at 6 to 50 hens, 2026 prices by sales channel, and what actually eats your margin.
Beginner GuidesHow to Sell Eggs Legally (Permits, Pricing, Taxes) 2026
Selling backyard chicken eggs legally: state permit rules, labeling, pricing, tax reporting, and the records you need to keep. Updated for 2026.
Beginner GuidesRaising Chickens for Eggs: From Hatching to Your First Egg
Everything you need to raise chickens for eggs: breeds, incubation, brooding, and getting the most production from your laying flock.